torch.compile, Mixed Precision, and SDPA: Speed Up TinyDiT
Where you are: Post 10 of 14 in PyTorch Tutorial 2026 · about 10 min read
What you’ll build: tinydit/fast.py: a FastTrainer with on/off switches for SDPA, mixed precision and torch.compile, an honest CPU benchmark of every combination, and one train.py command per experiment.
You’ll need: Post 5 (Trainer), Post 6 (attention) and Post 9 (TinyDiT).
In this post:
- Introduction
- Step 1/6: SDPA: The Attention Kernel PyTorch Ships
- Step 2/6: Mixed Precision: autocast, bfloat16 and the GradScaler
- Step 3/6: torch.compile: Turning Python into Fused Kernels
- Step 4/6: FastTrainer: Three Switches, Same Trainer
- Step 5/6: The Benchmark: What Actually Got Faster?
- Step 6/6: One Command per Experiment
- Recap
Series: PyTorch Tutorial 2026 (14 posts)
- Post 1: PyTorch Tutorial 2026: From Tensors to Tiny Diffusion
- Post 2: PyTorch Tensors Explained: Shapes, Broadcasting, and Images as Arrays
- Post 3: PyTorch Autograd: How backward() Builds Gradients
- Post 4: PyTorch DataLoader Explained: Datasets, Batches, and Image Folders
- Post 5: PyTorch nn.Module and the Training Loop: Layers, Loss, and Checkpoints
- Post 6: Attention and the Transformer Block in PyTorch
- Post 7: Patch Embeddings in PyTorch: How a Transformer Reads an Image
- Post 8: Flow Matching in PyTorch: Train a Model to Follow a Straight Line
- Post 9: Build a Tiny Diffusion Transformer in PyTorch (DiT from Scratch)
- Post 10: torch.compile, Mixed Precision, and SDPA: Speed Up TinyDiT (you are here)
- Post 11: RMSNorm, QK-Norm, SwiGLU, and 2D RoPE in a Tiny DiT
- Post 12: adaLN-Zero and Classifier-Free Guidance in PyTorch
- Post 13: MMDiT Joint Attention in PyTorch: Two Streams, One Generator
- Post 14: Train and Sample Like 2026: Logit-Normal Steps, EMA, and Few-Step Flow
Introduction
TinyDiT works, but it took 11 minutes for 6,000 steps on a CPU, and the Expert posts will train it again and again. So before we upgrade the model, let’s upgrade the training loop with the three speed tools PyTorch 2 is known for: F.scaled_dot_product_attention (SDPA), mixed precision with torch.autocast, and torch.compile.
We’ll add them to our trainer as simple on/off switches, check that the results don’t change, and then time every combination. Some of the results surprised me, and I’ll show you all of them, including the ones where a “speed-up” made things slower.
In Build a Tiny Diffusion Transformer in PyTorch (DiT from Scratch) we assembled and trained TinyDiT with the plain post-5 Trainer. Today’s FastTrainer is that same trainer with two extra options, and nothing else about the model or the loss changes.
Note: CPU settings used in this post: TinyDiT dim 128, depth 4, batch 128; timings on an 8-core CPU with the CPU-only build of PyTorch 2.15. I couldn’t measure a GPU for this post, so there are no GPU numbers below, only what to expect and why.
Step 1/6: SDPA: The Attention Kernel PyTorch Ships
In this step: We switch our hand-written attention to PyTorch’s fused F.scaled_dot_product_attention and time the difference.
In post 6 we wrote attention by hand, softmax(q @ k.T / sqrt(d)) @ v, and promised to switch to F.scaled_dot_product_attention later. It computes exactly the same thing, but as one fused operation.
On a GPU it can dispatch to FlashAttention (Dao et al., 2022), which never stores the full L \times L attention matrix, so it’s faster and uses far less memory. Let’s check that it’s the same math, and time one attention call.
First, the same inputs through both versions:
import time
import torch
import torch.nn.functional as F
from tinydit.attention import attention

torch.manual_seed(0)
q, k, v = (torch.randn(128, 4, 64, 32, requires_grad=True) for _ in range(3))   # (N, heads, L, head_dim)

out_manual, _ = attention(q, k, v)                     # post 6: softmax(q k^T / sqrt(d)) v, by hand
out_sdpa = F.scaled_dot_product_attention(q, k, v)      # PyTorch's fused version
print("same result:", torch.allclose(out_manual, out_sdpa, atol=1e-5))Then a small timing helper for forward plus backward:
def bench(fn, reps=30):
    for _ in range(3):                                  # warm up
        fn().sum().backward()
    t0 = time.perf_counter()
    for _ in range(reps):
        fn().sum().backward()
    return (time.perf_counter() - t0) / reps * 1000

print(f"forward + backward, CPU: manual {bench(lambda: attention(q, k, v)[0]):.1f} ms"
f" | SDPA {bench(lambda: F.scaled_dot_product_attention(q, k, v)):.1f} ms")same result: True
forward + backward, CPU: manual 8.9 ms | SDPA 2.0 msSame output, and about 4.5× faster for attention alone (forward and backward), even on a CPU. Our MultiHeadAttention has had a use_sdpa flag since post 6, so switching costs one argument: TinyDiT(cfg, use_sdpa=True).
Note: From now on we keep SDPA on. The only thing we lose is the ability to look at the attention weights, which we only needed for the post-6 heatmap.
SDPA: what, why, how
What it is: a fused call that computes attention, \operatorname{softmax}(QK^\top/\sqrt{d})V, in one operation.
Why it works: attention’s big cost is the L \times L score matrix. A fused kernel avoids writing it out and reading it back, and on GPUs FlashAttention computes it in tiles that fit in fast on-chip memory.
How it works: swap attention(q, k, v) for F.scaled_dot_product_attention(q, k, v). Same shapes, same result (checked to 1e-5). In TinyDiT: use_sdpa=True.
What you just built: SDPA switched on in TinyDiT: the same attention result, 4.5× faster for attention alone.
Step 2/6: Mixed Precision: autocast, bfloat16 and the GradScaler
In this step: We run most of the math in 16-bit floats with torch.autocast, and see why float16 needs a GradScaler while bfloat16 doesn’t.
Normally every number in our model is a 32-bit float. Mixed precision runs most of the heavy maths (the matrix multiplies) in a 16-bit format instead. 16-bit numbers are half the memory and, on GPUs with tensor cores, much faster to multiply.
There are two 16-bit formats:
| Format | Range | Precision | Needs a GradScaler? |
|---|---|---|---|
float16 | small (smallest normal number about 6e-5) | about 3 decimal digits | yes |
bfloat16 | same as float32 | about 2 decimal digits | no |
torch.autocast picks, op by op, which precision to use. The weights themselves stay in float32. Here’s what that looks like, and why float16 needs a helper:
import torch
from torch import nn

x = torch.randn(8, 64, 128)
lin, norm = nn.Linear(128, 128), nn.LayerNorm(128)

with torch.autocast("cpu", dtype=torch.bfloat16):      # on a GPU: torch.autocast("cuda", dtype=torch.bfloat16)
    h = lin(x)                                          # matmuls run in bfloat16
    n = norm(h)                                         # CPU autocast keeps these in bfloat16 too;
    s = h.softmax(dim=-1)                               # CUDA autocast runs them in float32
print("inside autocast -> linear:", h.dtype, "| layer_norm:", n.dtype, "| softmax:", s.dtype)
print("outside autocast -> weights stay:", lin.weight.dtype)

# Why float16 needs a GradScaler: tiny gradients underflow to zero
g = torch.tensor([1e-8, 1e-5, 1e-3])
print("float32 :", g.tolist())
print("float16 :", g.half().tolist(), " <- 1e-8 became 0")
print("scaled  :", (g * 65536).half().float().div(65536).tolist(), " <- scale up, cast, scale back: survives")
print("bfloat16:", g.bfloat16().float().tolist(), " <- float32's range, fewer digits: no scaler needed")inside autocast -> linear: torch.bfloat16 | layer_norm: torch.bfloat16 | softmax: torch.bfloat16
outside autocast -> weights stay: torch.float32
float32 : [9.99999993922529e-09, 9.999999747378752e-06, 0.0010000000474974513]
float16 : [0.0, 1.0013580322265625e-05, 0.0010004043579101562] <- 1e-8 became 0
scaled : [9.997165761888027e-09, 9.998679161071777e-06, 0.0010004043579101562] <- scale up, cast, scale back: survives
bfloat16: [1.0011717677116394e-08, 1.0013580322265625e-05, 0.00099945068359375] <- float32's range, fewer digits: no scaler neededTwo things to notice. First, the exact list of ops that stay in float32 depends on the device: on a CPU, autocast ran LayerNorm and softmax in bfloat16 too, while CUDA autocast keeps them in float32 for safety.
Watch out: float16 can’t represent very small numbers, so tiny gradients silently become zero. The GradScaler fixes this by multiplying the loss by a big factor before backward() (so the gradients are big enough to survive), then dividing it back out before the optimizer step. bfloat16 has the same range as float32, so it doesn’t need a scaler.
\begin{aligned} &\underbrace{\text{loss} \times S}_{\texttt{scaler.scale(loss)}} \xrightarrow{\texttt{backward()}} \underbrace{S \cdot \nabla w}_{\text{big enough for float16}} \\ &\xrightarrow{\texttt{scaler.unscale\_}} \nabla w \xrightarrow{\texttt{scaler.step}} \text{update, or skip if inf/NaN} \end{aligned}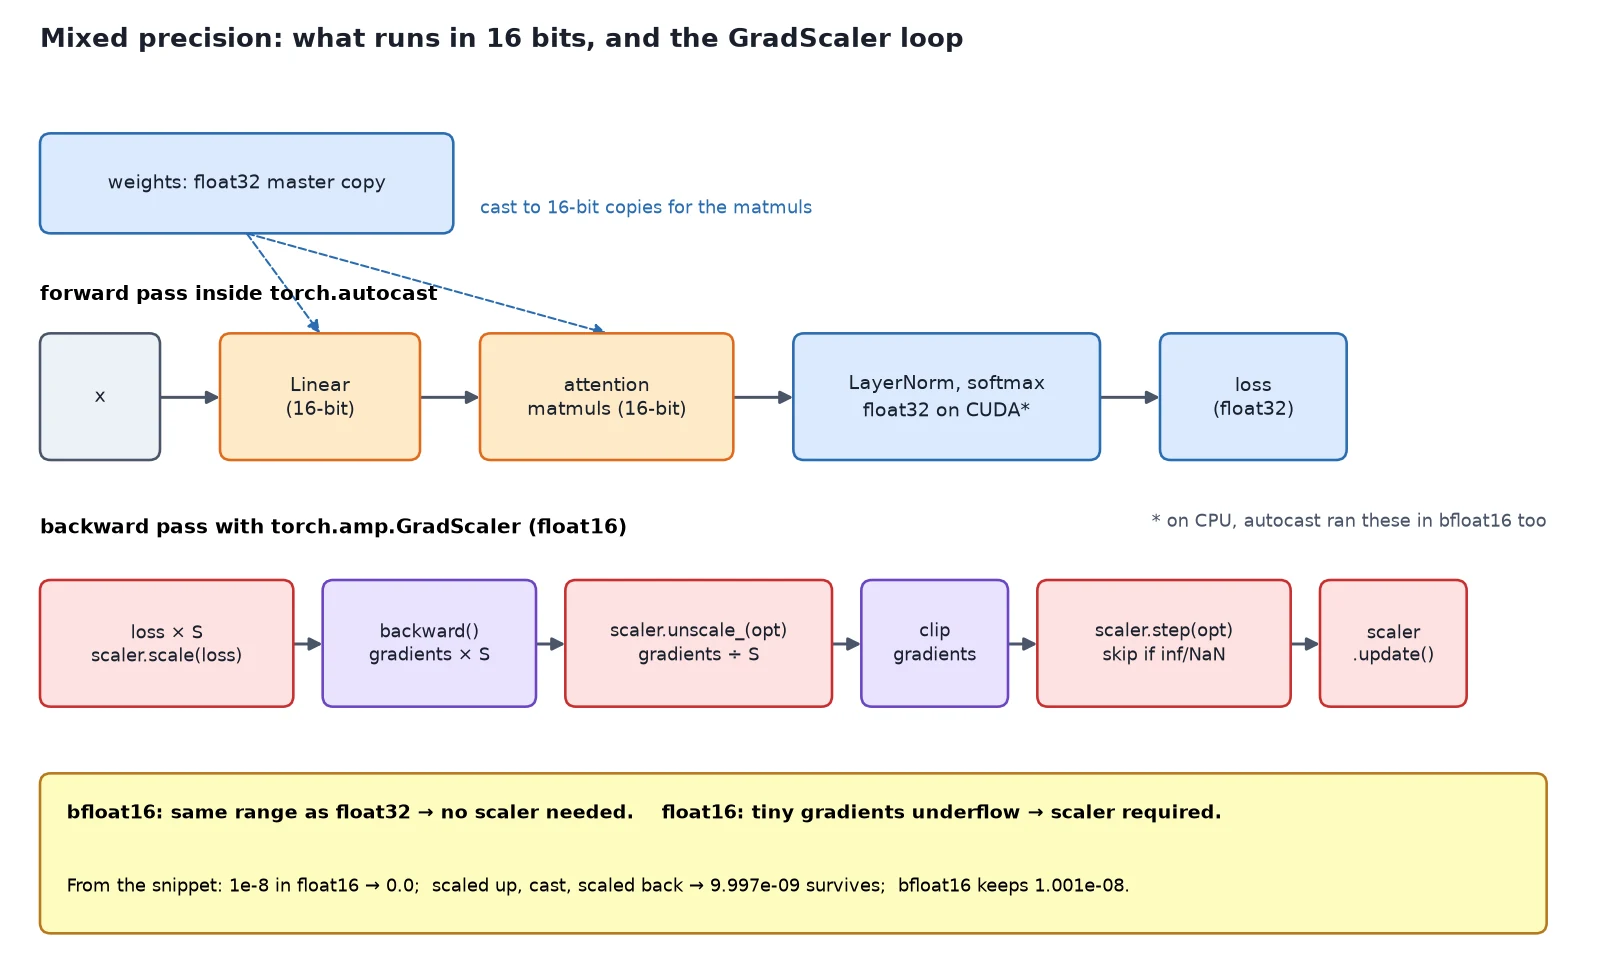
Mixed precision: what, why, how
What it is: running most of the maths in 16-bit floats.
Why it works: 16-bit numbers halve memory traffic, and GPU tensor cores multiply them much faster. Autocast keeps sensitive ops in float32 (on CUDA), and the weights stay float32.
How it works: wrap the forward pass and loss in torch.autocast(device, dtype=torch.bfloat16). For float16, also use torch.amp.GradScaler: scaler.scale(loss).backward(), scaler.unscale_(opt), clip, scaler.step(opt), scaler.update().
What you just built: A working understanding of torch.autocast, bfloat16 vs float16, and the GradScaler loop.
Step 3/6: torch.compile: Turning Python into Fused Kernels
In this step: We compile TinyDiT with torch.compile, look at its three stages, and check that it captures the whole model in one graph.
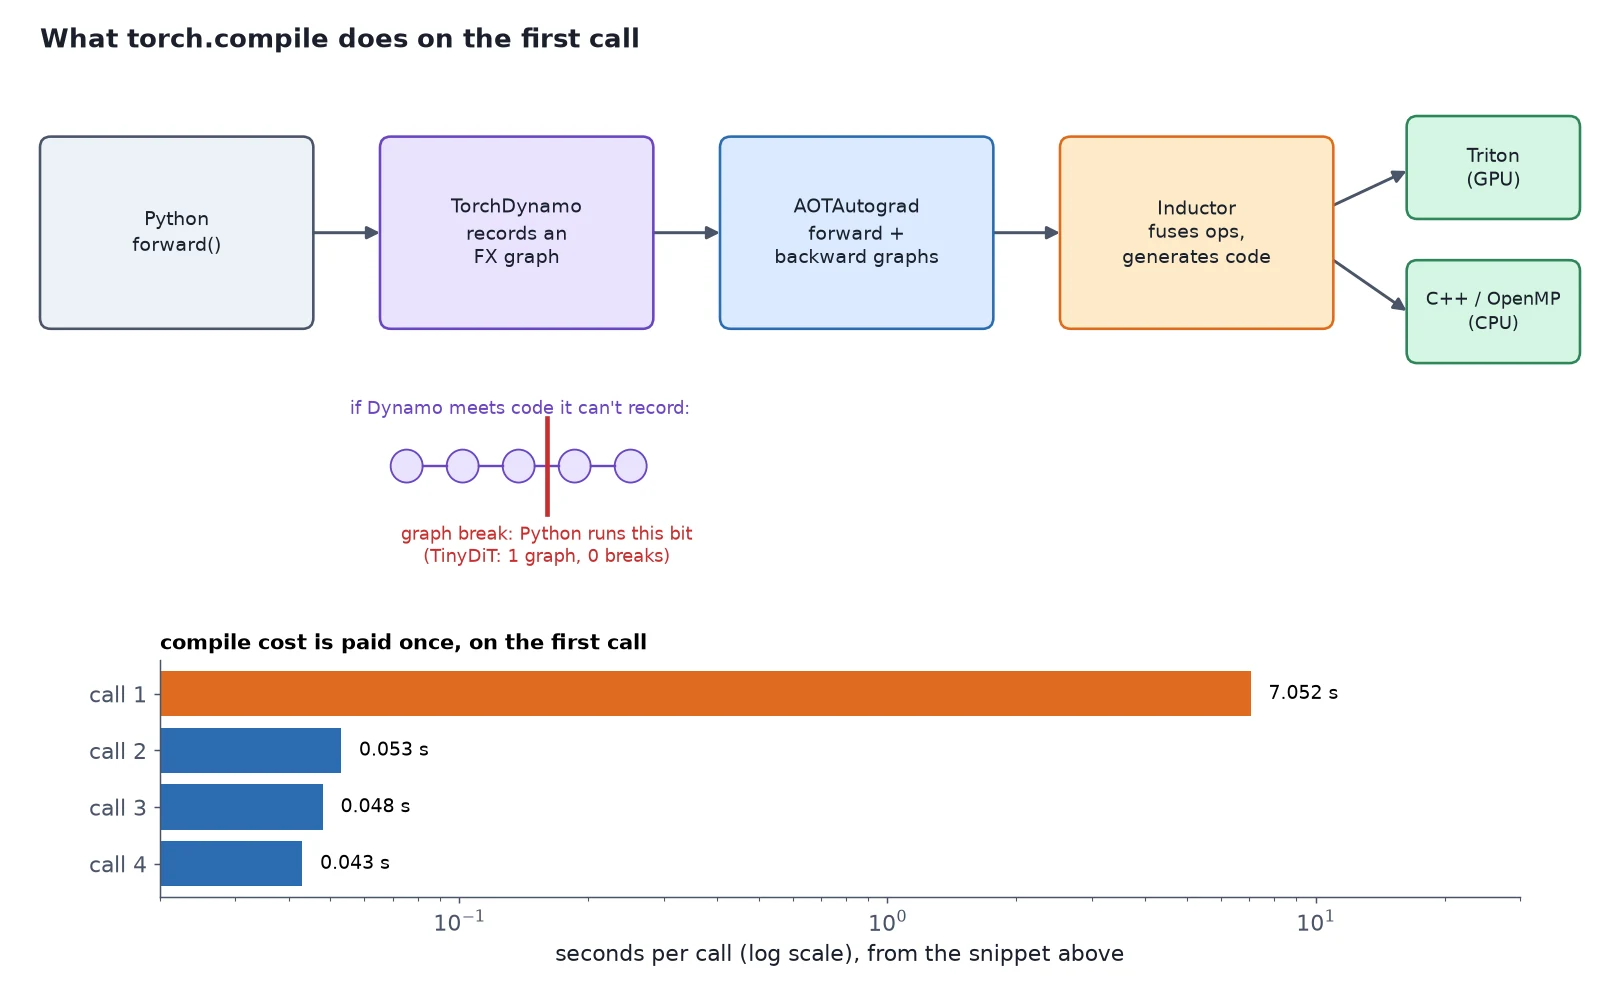
torch.compile(model) returns a version of the model that runs through a compiler. It has three stages:
- TorchDynamo watches your Python
forwardrun and records the tensor operations into a graph. If it meets something it can’t record, it splits the graph there (a graph break) and falls back to normal Python for that bit. - AOTAutograd builds the backward graph ahead of time, so training gets compiled too.
- Inductor (the default backend) fuses many small operations into a few bigger kernels and generates code for them: Triton on NVIDIA GPUs, C++ with OpenMP on CPUs.
import time
import torch
from tinydit import TinyDiTConfig
from tinydit.model import TinyDiT

torch.manual_seed(0)
model = TinyDiT(TinyDiTConfig(dim=128, depth=4), use_sdpa=True).eval()
x, t = torch.randn(64, 3, 32, 32), torch.rand(64)

explanation = torch._dynamo.explain(model)(x, t)
print("graphs:", explanation.graph_count, "| graph breaks:", explanation.graph_break_count)

compiled = torch.compile(model)                         # nothing happens yet...
with torch.no_grad():
    for i in range(4):
        t0 = time.perf_counter()
        out = compiled(x, t)                            # ...the first call traces and compiles
        print(f"call {i + 1}: {time.perf_counter() - t0:.3f} s")
print("matches eager:", torch.allclose(out, model(x, t), atol=1e-4))graphs: 1 | graph breaks: 0
call 1: 7.052 s
call 2: 0.053 s
call 3: 0.048 s
call 4: 0.043 s
matches eager: TrueTinyDiT compiles into a single graph with no graph breaks, so the whole forward pass is captured. The first call took 7 seconds because that’s when compilation happens. After that, calls take milliseconds, and the output matches the uncompiled model.
Watch out: On a CPU, Inductor writes C++ code and needs a C++ compiler (g++) on your machine. Colab and most Linux machines already have one. On a bare Docker image you may need apt install build-essential.
torch.compile: what, why, how
What it is: a way to make a model run faster without rewriting it.
Why it works: TorchDynamo captures the forward pass as a graph, AOTAutograd adds the backward pass, and Inductor fuses small ops into fewer, bigger kernels.
How it works: net = torch.compile(model), then call net instead of model. The first call compiles (7 to 10 seconds here), later calls reuse the compiled code. Check for graph breaks with torch._dynamo.explain(model)(x, t).
What you just built: A compiled TinyDiT: one graph, no graph breaks, same output as the eager model.
Step 4/6: FastTrainer: Three Switches, Same Trainer
In this step: We add mixed precision and torch.compile to the post-5 Trainer as two switches, keeping a plain debug mode.
The constructor adds the two options. self.model stays the plain module (so checkpoints keep clean parameter names) and self.net is what we call, compiled or not:
"""FastTrainer (post 10): the post-5 Trainer plus mixed precision and torch.compile.

Nothing else changes: same loss_fn(model, batch), same fit / evaluate / save / load.
  amp_dtype=None            full float32 (the debug-friendly default)
  amp_dtype=torch.bfloat16  autocast to bfloat16 (CPU or recent GPUs; no scaler needed)
  amp_dtype=torch.float16   autocast to float16 + GradScaler (classic CUDA AMP)
  compile=True              run the forward/backward through torch.compile (Inductor)
"""
import torch
from torch import nn

from .trainer import Trainer, move_to


class FastTrainer(Trainer):
    def __init__(self, model: nn.Module, loss_fn, *, amp_dtype: torch.dtype | None = None,
                 compile: bool = False, **kwargs):
        super().__init__(model, loss_fn, **kwargs)
        self.amp_dtype = amp_dtype
        # GradScaler only matters for float16, whose small range can underflow gradients to zero.
        self.scaler = torch.amp.GradScaler(self.device.type, enabled=amp_dtype == torch.float16)
        # self.model stays the plain module (clean state_dict keys); self.net is what we call.
self.net = torch.compile(self.model) if compile else self.modeltrain_step wraps the forward pass in autocast and routes the backward pass through the GradScaler:
    def train_step(self, batch) -> float:
        self.model.train()
        batch = move_to(batch, self.device)
        self.optimizer.zero_grad(set_to_none=True)
        with torch.autocast(self.device.type, dtype=self.amp_dtype or torch.float32,
                            enabled=self.amp_dtype is not None):
            loss = self.loss_fn(self.net, batch)          # forward runs in low precision where safe
        self.scaler.scale(loss).backward()                # backward outside autocast
        if self.max_grad_norm is not None:
            self.scaler.unscale_(self.optimizer)          # clip the real gradients, not scaled ones
            nn.utils.clip_grad_norm_(self.model.parameters(), self.max_grad_norm)
        self.scaler.step(self.optimizer)                  # skips the step if fp16 grads overflowed
        self.scaler.update()
        self.step += 1
return loss.item()With amp_dtype=None and compile=False, it does exactly what the post-5 Trainer does.
Note: That’s our debug mode: when something goes wrong, turn everything off first.
What you just built: FastTrainer in tinydit/fast.py: the post-5 Trainer plus amp_dtype and compile switches.
Step 5/6: The Benchmark: What Actually Got Faster?
In this step: We time five setups on full training steps and explain honestly why only SDPA helped on a CPU.
Now the honest test. Same 20 CIFAR-10 batches, same seed, five setups, timed on full training steps (forward, backward and AdamW update).
The five setups:
import time
import torch
from tinydit import TinyDiTConfig
from tinydit.data import CachedCIFAR10, make_loader
from tinydit.fast import FastTrainer
from tinydit.flow import flow_matching_loss
from tinydit.model import TinyDiT

cfg = TinyDiTConfig(dim=128, depth=4, num_heads=4)
loader = make_loader(CachedCIFAR10("data", train=True), batch_size=128, num_workers=0)
batches = [b for _, b in zip(range(20), loader)]               # same 20 batches for every setup

setups = [("post 9: eager, manual attention, fp32", dict(sdpa=False)),
          ("+ SDPA", dict(sdpa=True)),
          ("+ SDPA + bf16 autocast", dict(sdpa=True, amp_dtype=torch.bfloat16)),
          ("+ SDPA + torch.compile", dict(sdpa=True, compile=True)),
("+ SDPA + compile + bf16", dict(sdpa=True, compile=True, amp_dtype=torch.bfloat16))]Each setup times the first step (which includes compiling), warms up, then times 45 steps:
for name, opts in setups:
    torch.manual_seed(0)
    model = TinyDiT(cfg, use_sdpa=opts.pop("sdpa"))
    trainer = FastTrainer(model, flow_matching_loss, lr=3e-4, **opts)
    t0 = time.perf_counter()
    trainer.train_step(batches[0])                             # first step (includes compiling)
    first = time.perf_counter() - t0
    for b in batches[1:5]:                                     # warm-up (compile can need a 2nd pass)
        trainer.train_step(b)
    t0 = time.perf_counter()
    for _ in range(3):
        for b in batches[5:]:
            loss = trainer.train_step(b)
    per_step = (time.perf_counter() - t0) / 45 * 1000
print(f"{name:40s} first step {first:6.1f} s | {per_step:6.1f} ms/step | loss {loss:.3f}")post 9: eager, manual attention, fp32 first step 0.2 s | 75.7 ms/step | loss 0.558
+ SDPA first step 0.1 s | 73.2 ms/step | loss 0.558
+ SDPA + bf16 autocast first step 0.1 s | 83.5 ms/step | loss 0.558
+ SDPA + torch.compile first step 8.3 s | 162.2 ms/step | loss 0.558
+ SDPA + compile + bf16 first step 9.9 s | 165.0 ms/step | loss 0.559| Setup | ms per step | vs post 9 | First step |
|---|---|---|---|
| post 9: eager, manual attention, fp32 | 75.7 | 1.00× | 0.2 s |
| + SDPA | 73.2 | 1.03× faster | 0.1 s |
| + SDPA + bf16 autocast | 83.5 | 0.91× (slower) | 0.1 s |
| + SDPA + torch.compile | 162.2 | 0.47× (slower) | 8.3 s |
| + SDPA + compile + bf16 | 165.0 | 0.46× (slower) | 9.9 s |
All five setups give the same loss, so none of them changed the maths in a way that matters. But on this CPU only SDPA helped, and only by 3% end to end.
Why so little, when attention alone got 4.5× faster? Because with just 64 tokens, attention is a small part of TinyDiT’s work. Most of the time goes into the Linear layers of the FFNs and adaLN.
Why bfloat16 and compile were slower here
bfloat16 and torch.compile made training slower here, and that’s worth understanding rather than hiding:
- bfloat16 on a CPU saves little. The conversions to and from bfloat16 cost time, and a CPU doesn’t have the tensor cores that make 16-bit matmuls so fast on a GPU.
- torch.compile on a tiny CPU model has little to win. The big matmuls already call optimised libraries, and the fusions Inductor adds are small at this size. On my test machine the generated CPU code was also clearly slower than PyTorch’s own kernels.
Watch out: I also used a non-standard C++ toolchain on the test machine, which may have made compile worse. Treat that row as “no gain on this CPU”, not as a general verdict.
On a GPU the picture is different, for the same reasons in reverse: tensor cores make bf16 matmuls several times faster than float32, and fusing many small kernels saves a lot of GPU launch overhead and memory traffic. That’s where PyTorch’s published compile speed-ups come from.
I haven’t measured it for TinyDiT on a GPU, so I won’t quote a number. Run 04_benchmark.py on your GPU and you’ll have your own.
Note: Our rule for the rest of the series: on a CPU, train with SDPA and float32, eager. On a GPU, also turn on amp_dtype=torch.bfloat16 and compile=True. When you’re debugging, turn compile off. Tiny CPU models are exactly when not to compile.
What you just built: Measured CPU numbers for all five setups and a clear rule for when to use each speed tool.
Step 6/6: One Command per Experiment
In this step: We set up the single training script every Expert post uses, so all comparisons run with the same settings and scores.
The Expert posts compare many versions of TinyDiT. To keep those comparisons fair, every run goes through one script, code/train.py.
It builds the model from config flags, trains with FastTrainer, and writes a metrics.json with the loss curve, the held-out velocity MSE and probe-FD from post 9, the speed, and a sample grid:
# One experiment = one command. Every Expert post (11-14) runs its before/after this way.
cd code
python train.py --out runs/baseline --steps 4000 --set dim=128 --set depth=4      # CPU size
python train.py --out runs/gpu --steps 20000 --amp bf16 --compile                # on a GPU (defaults: dim 256, depth 6)
python train.py --out runs/debug --steps 50                                     # quick check, eager fp32
# each run writes runs/<name>/metrics.json (loss curve, velocity MSE, probe-FD, speed) and samples.pngWhat you just built: code/train.py: one command per experiment, with the same settings and the same scores every time.
Recap
- torch.compile, AMP and SDPA are each a one-line switch in our
FastTrainer, and none of them changed the loss. - SDPA made attention 4.5× faster and we keep it on everywhere.
- On an 8-core CPU, end-to-end training was only 3% faster with SDPA, about 10% slower with bfloat16 and about 2× slower with
torch.compile(plus 8 seconds of compiling). Tiny CPU models are exactly the case where compile doesn’t pay. - On a GPU, turn on bf16 and compile. That’s where they shine, but I didn’t measure TinyDiT on a GPU, so there are no GPU numbers here.
- Every Expert experiment from now on is one
train.pycommand with the same settings and the same scores.
Next up: The Expert posts begin. In RMSNorm, QK-Norm, SwiGLU, and 2D RoPE in a Tiny DiT we upgrade the transformer block itself with RMSNorm, QK-norm, SwiGLU and 2D RoPE, and measure each change on its own.
Series: PyTorch Tutorial 2026 (14 posts)
- Post 1: PyTorch Tutorial 2026: From Tensors to Tiny Diffusion
- Post 2: PyTorch Tensors Explained: Shapes, Broadcasting, and Images as Arrays
- Post 3: PyTorch Autograd: How backward() Builds Gradients
- Post 4: PyTorch DataLoader Explained: Datasets, Batches, and Image Folders
- Post 5: PyTorch nn.Module and the Training Loop: Layers, Loss, and Checkpoints
- Post 6: Attention and the Transformer Block in PyTorch
- Post 7: Patch Embeddings in PyTorch: How a Transformer Reads an Image
- Post 8: Flow Matching in PyTorch: Train a Model to Follow a Straight Line
- Post 9: Build a Tiny Diffusion Transformer in PyTorch (DiT from Scratch)
- Post 10: torch.compile, Mixed Precision, and SDPA: Speed Up TinyDiT (you are here)
- Post 11: RMSNorm, QK-Norm, SwiGLU, and 2D RoPE in a Tiny DiT
- Post 12: adaLN-Zero and Classifier-Free Guidance in PyTorch
- Post 13: MMDiT Joint Attention in PyTorch: Two Streams, One Generator
- Post 14: Train and Sample Like 2026: Logit-Normal Steps, EMA, and Few-Step Flow
← Previous: Post 9: Build a Tiny Diffusion Transformer in PyTorch (DiT from Scratch)
Next → Post 11: RMSNorm, QK-Norm, SwiGLU, and 2D RoPE in a Tiny DiT