PyTorch Tensors Explained: Shapes, Broadcasting, and Images as Arrays
Where you are: Post 2 of 14 in PyTorch Tutorial 2026 · about 11 min read
What you’ll build: tinydit/images.py, the module every later post imports to turn photos into (N, C, H, W) tensors and back, plus a working feel for shapes, views and broadcasting.
You’ll need: Post 1 (PyTorch installed and your first tensor).
In this post:
- Introduction
- Step 1/6: What Is a PyTorch Tensor? Create and Index
- Step 2/6: Reshape, View, and Real Copies
- Step 3/6: Broadcasting in PyTorch Tensors
- Step 4/6: Images as Tensors: Why N, C, H, W
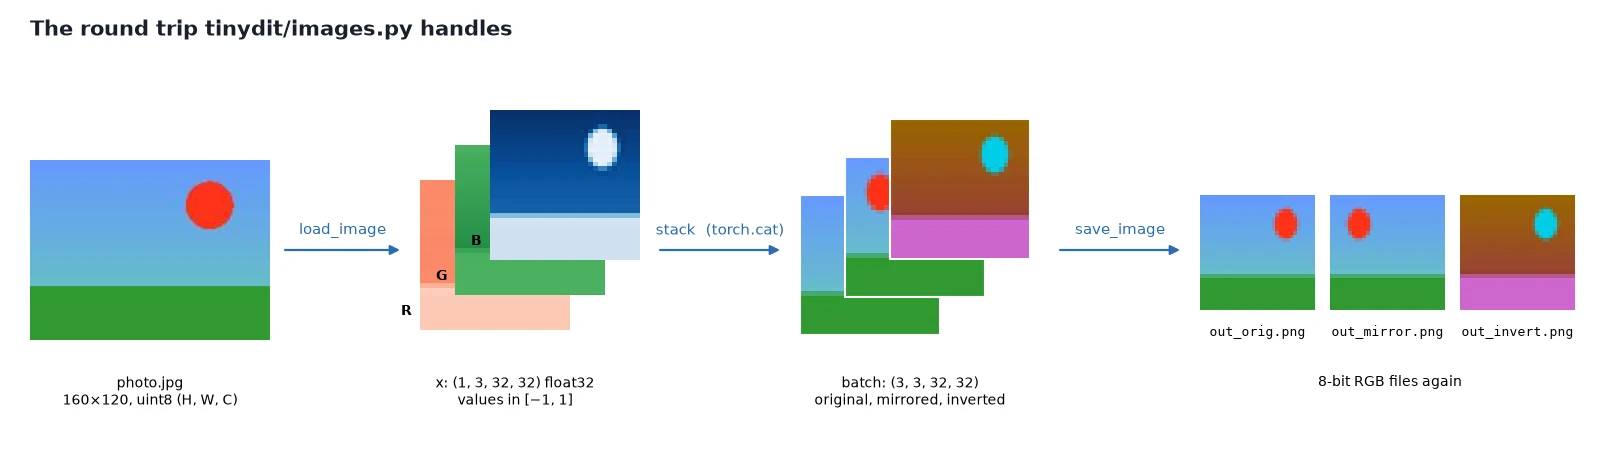
- Step 5/6: The TinyDiT Image Utilities
- Step 6/6: The Three Classic Tensor Errors (and Fixes)
- Recap
Series: PyTorch Tutorial 2026 (14 posts)
- Post 1: PyTorch Tutorial 2026: From Tensors to Tiny Diffusion
- Post 2: PyTorch Tensors Explained: Shapes, Broadcasting, and Images as Arrays (you are here)
- Post 3: PyTorch Autograd: How backward() Builds Gradients
- Post 4: PyTorch DataLoader Explained: Datasets, Batches, and Image Folders
- Post 5: PyTorch nn.Module and the Training Loop: Layers, Loss, and Checkpoints
- Post 6: Attention and the Transformer Block in PyTorch
- Post 7: Patch Embeddings in PyTorch: How a Transformer Reads an Image
- Post 8: Flow Matching in PyTorch: Train a Model to Follow a Straight Line
- Post 9: Build a Tiny Diffusion Transformer in PyTorch (DiT from Scratch)
- Post 10: torch.compile, Mixed Precision, and SDPA: Speed Up TinyDiT
- Post 11: RMSNorm, QK-Norm, SwiGLU, and 2D RoPE in a Tiny DiT
- Post 12: adaLN-Zero and Classifier-Free Guidance in PyTorch
- Post 13: MMDiT Joint Attention in PyTorch: Two Streams, One Generator
- Post 14: Train and Sample Like 2026: Logit-Normal Steps, EMA, and Few-Step Flow
Introduction
A PyTorch tensor is the one data type everything in deep learning is built from: images, noise, model weights and gradients. In this post you will learn how to create tensors, read and change their shape, use broadcasting without fear, and turn a real photo into the (N, C, H, W) layout every vision model expects.
By the end you will have tinydit/images.py, the small module that every later post in this series imports to load and save pictures.
In PyTorch Tutorial 2026: From Tensors to Tiny Diffusion we installed PyTorch and made a first tensor. Now we slow down and really look at it, because almost every bug a beginner hits in PyTorch is a shape, dtype or device bug. If you understand those three words, you have already avoided half of the debugging in this series.
Step 1/6: What Is a PyTorch Tensor? Create and Index
In this step: We create tensors of different ranks, read their shape and dtype, and pick out parts of them with indexing and slicing.
A tensor is a grid of numbers with a fixed number type. The number of axes is called its rank or ndim:
- 0 axes: a single number, like a loss value;
- 1 axis: a vector, like one token’s 256 features;
- 2 axes: a matrix, like the weights of a Linear layer;
- 3 axes: one color image,
(channels, height, width); - 4 axes: a batch of color images,
(N, C, H, W).
You make tensors from Python lists or with factory functions:
import torch

x = torch.tensor([1, 2, 3])              # ints -> int64
y = torch.tensor([1.0, 2.0, 3.0])        # floats -> float32
z = torch.tensor([1, 2, 3], dtype=torch.float32)  # ask for a dtype

print(x.dtype, y.dtype, z.dtype)
print(x.shape, x.ndim, x.numel())         # shape, number of axes, number of elements

img = torch.zeros(3, 4, 5)                # 3 channels, 4 rows, 5 columns
print(img.shape, img.ndim, img.numel())
print(torch.arange(6))                    # 0, 1, ..., 5
print(torch.linspace(0, 1, 5))            # 5 evenly spaced numbers
print(torch.randn(2, 3).shape) # standard-normal noise (we'll use this a lot)torch.int64 torch.float32 torch.float32
torch.Size([3]) 1 3
torch.Size([3, 4, 5]) 3 60
tensor([0, 1, 2, 3, 4, 5])
tensor([0.0000, 0.2500, 0.5000, 0.7500, 1.0000])
torch.Size([2, 3])A few things worth noticing:
- PyTorch guessed
int64for whole numbers andfloat32for decimals. Neural network math usesfloat32(or lower precision on GPUs, which we cover in post 10). Labels and indices useint64. shapeis atorch.Size, which behaves like a tuple.numel()is the total number of elements, the product of the shape: 3 \times 4 \times 5 = 60.torch.randndraws from a standard normal distribution (mean 0, standard deviation 1). That is exactly the noise our diffusion model will start from.
Indexing and slicing
Indexing works like NumPy. Each axis gets its own index or slice, separated by commas:
import torch

x = torch.arange(12).reshape(3, 4)
print(x)
print(x[0])          # first row
print(x[:, 1])       # second column
print(x[1:, 2:])     # bottom-right block
print(x[-1, -1])     # last element
print(x[x > 6]) # boolean mask -> 1-D tensor of the matchestensor([[ 0, 1, 2, 3],
[ 4, 5, 6, 7],
[ 8, 9, 10, 11]])
tensor([0, 1, 2, 3])
tensor([1, 5, 9])
tensor([[ 6, 7],
[10, 11]])
tensor(11)
tensor([ 7, 8, 9, 10, 11])x[:, 1] reads as “every row, column 1”. The colon means “everything along this axis”.
This pattern shows up all the time in vision code: img[:, :, :16, :16] is “every image, every channel, the top-left 16×16 corner”.
What you just built: Tensors of rank 0 to 4, with their shape, dtype and numel(), and the indexing patterns you will use on image batches.
Step 2/6: Reshape, View, and Real Copies
In this step: We change a tensor’s shape without changing its numbers, and see when PyTorch shares memory and when it copies.
Changing a tensor’s shape without changing its numbers is the most common tensor operation in a transformer. A transformer constantly switches between “a grid of patches” and “a list of tokens”, and between “one big vector” and “several heads”. So it’s worth knowing what actually happens in memory.
import torch

x = torch.arange(6)
v = x.view(2, 3)        # same memory, new shape
v[0, 0] = 100           # writing through the view...
print(x)                # ...changes x too!

c = x.clone().view(2, 3)  # a real copy
c[0, 0] = -1
print(x[0])             # x is untouched

t = v.T                 # transpose: a view with swapped strides
print(t.is_contiguous())
try:
    t.view(6)
except RuntimeError as e:
    print("view failed:", str(e)[:60], "...")
print(t.reshape(6))     # reshape copies only when it has to
print(v.flatten(), v.unsqueeze(0).shape, v.unsqueeze(0).squeeze(0).shape)tensor([100, 1, 2, 3, 4, 5])
tensor(100)
False
view failed: view size is not compatible with input tensor's size and str ...
tensor([100, 3, 1, 4, 2, 5])
tensor([100, 1, 2, 3, 4, 5]) torch.Size([1, 2, 3]) torch.Size([2, 3])What happened here:
view(2, 3)gives a new shape over the same memory. Writingv[0, 0] = 100also changedx. That is fast (nothing is copied) but it can surprise you.clone()makes a real copy. Changingcleavesxalone. (x[0]is still 100 from step 1.).T(transpose) is also a view, but the numbers are no longer laid out row by row in memory, so the tensor is not contiguous.viewrefuses to work on it.reshapeis the friendly version: it returns a view when it can and copies when it must. When in doubt, usereshape.unsqueeze(0)adds an axis of size 1 at the front, andsqueeze(0)removes it. That is how one image(3, H, W)becomes a batch of one,(1, 3, H, W).
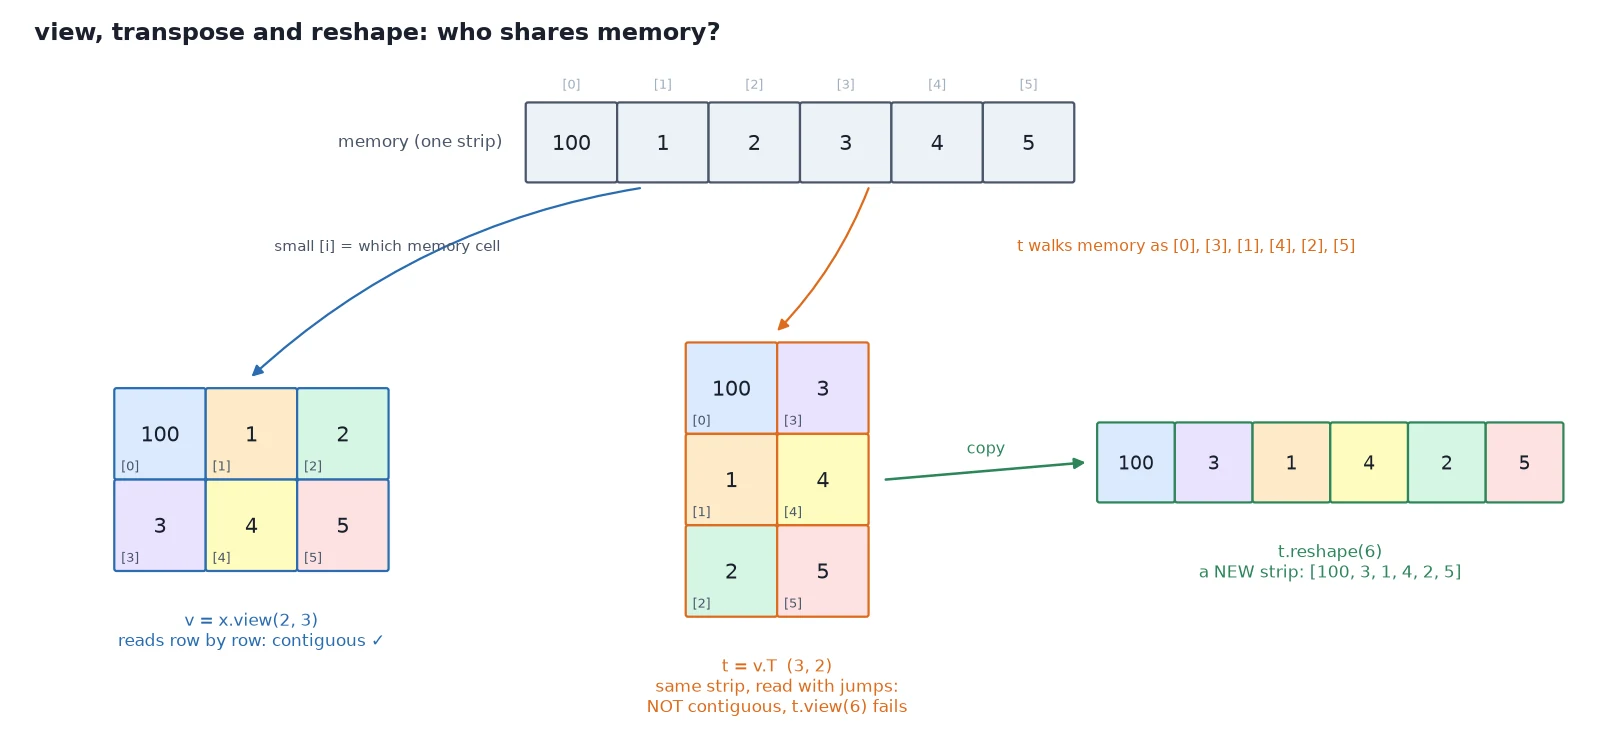
Watch out: Writing into a view changes the original tensor too. Use clone() when you need an independent copy.
What you just built: The difference between view (shared memory, needs a contiguous tensor), reshape (copies only when needed) and clone (always copies), plus unsqueeze/squeeze for batch axes.
Step 3/6: Broadcasting in PyTorch Tensors
In this step: We learn the rule PyTorch uses to combine tensors of different shapes, and the one trap that catches everyone with images.
Broadcasting is how PyTorch combines tensors of different shapes without you writing a loop. It’s how you subtract one mean per color channel from a whole image, or add one position vector to every image in a batch.
The rule, applied to the shapes lined up from the right:
- Two axes are compatible if they are equal, or if one of them is 1.
- An axis of size 1 is stretched (virtually, no copy) to match the other.
- If one tensor has fewer axes, it is treated as if it had extra size-1 axes on the left.
\begin{gathered} \underbrace{(3,\ 1)}_{\text{col}} \;+\; \underbrace{(1,\ 4)}_{\text{row}} \;\xrightarrow{\text{stretch the 1s}}\; (3,\ 4) \\ \underbrace{(3,\ 32,\ 32)}_{\text{image}} - \underbrace{(3,\ 1,\ 1)}_{\text{per-channel mean}} \;\rightarrow\; (3,\ 32,\ 32) \end{gathered}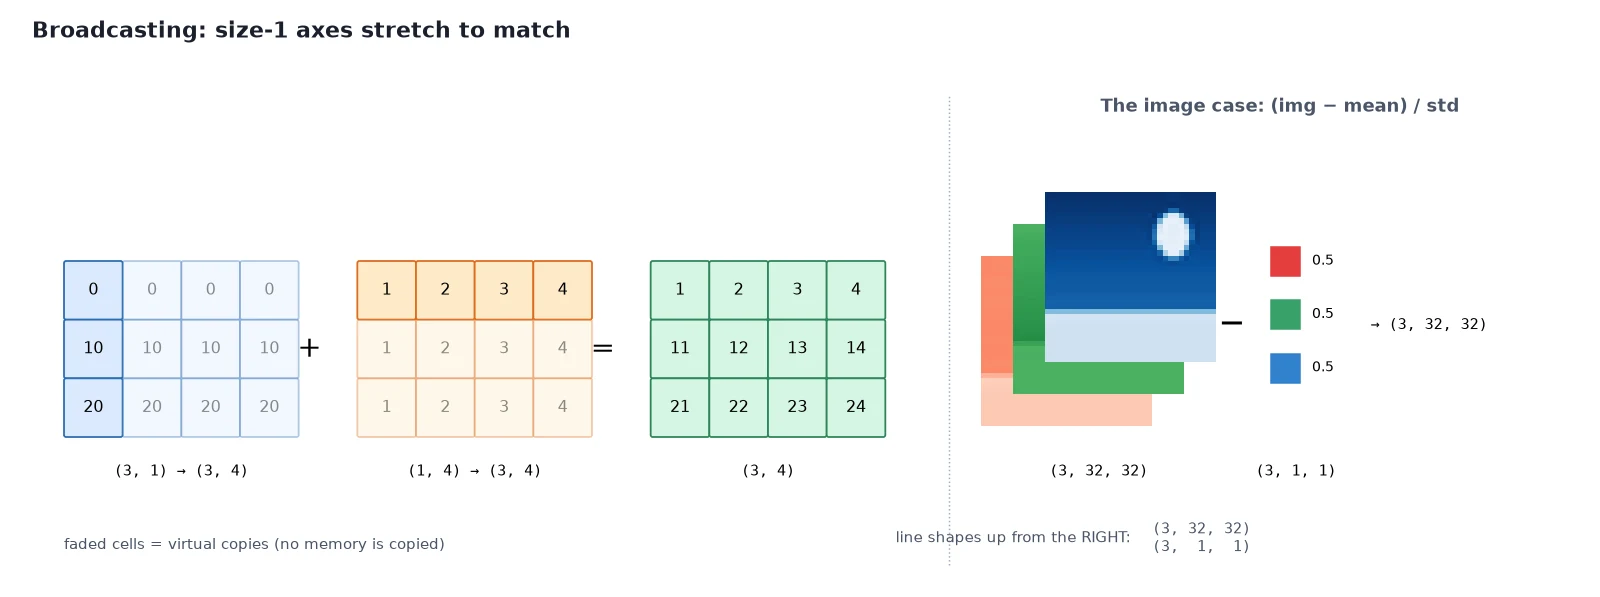
import torch

col = torch.tensor([[0.0], [10.0], [20.0]])   # shape (3, 1)
row = torch.tensor([[1.0, 2.0, 3.0, 4.0]])    # shape (1, 4)
print(col + row)                               # -> shape (3, 4)
print((col + row).shape)

# The image case: one value per channel, applied to every pixel.
img = torch.rand(3, 32, 32)                    # (C, H, W) in [0, 1]
mean = torch.tensor([0.5, 0.5, 0.5]).view(3, 1, 1)
std = torch.tensor([0.5, 0.5, 0.5]).view(3, 1, 1)
out = (img - mean) / std                       # (3,32,32) op (3,1,1) -> (3,32,32)
print(out.shape, round(out.min().item(), 2), round(out.max().item(), 2))

try:
    torch.rand(3, 32, 32) - torch.tensor([0.5, 0.5, 0.5])   # (3,) lines up with W=32, not C!
except RuntimeError as e:
print("Error:", e)tensor([[ 1., 2., 3., 4.],
[11., 12., 13., 14.],
[21., 22., 23., 24.]])
torch.Size([3, 4])
torch.Size([3, 32, 32]) -1.0 1.0
Error: The size of tensor a (32) must match the size of tensor b (3) at non-singleton dimension 2Watch out: The last line is the classic broadcasting trap. A tensor of shape (3,) lines up with the last axis of the image, which is the width (32), not the channels. The fix is to give it the shape (3, 1, 1) with view(3, 1, 1), so it lines up with the channel axis.
Normalizing an image from [0, 1] to [-1, 1] with mean 0.5 and std 0.5 is exactly this:
\begin{gathered} x_{\text{model}} = \frac{x_{\text{pixel}} - \overbrace{0.5}^{\text{mean}}}{\underbrace{0.5}_{\text{std}}} = 2\,x_{\text{pixel}} - 1 \\ x_{\text{pixel}} \in [0, 1] \;\Rightarrow\; x_{\text{model}} \in [-1, 1] \end{gathered}Why it works: Our diffusion model will mix images with Gaussian noise, which is centered on 0. Keeping the images centered on 0 too puts both ends of that mix on a similar scale. That is why we use [-1, 1].
What you just built: The broadcasting rule (line up from the right, stretch size-1 axes) and the (3, 1, 1) shape for per-channel values.
Step 4/6: Images as Tensors: Why N, C, H, W
In this step: We see why PyTorch stores images as (N, C, H, W) and how to convert from the (H, W, C) layout image libraries use.
Image libraries such as PIL and NumPy store a picture as (height, width, channels), often called HWC, with 8-bit numbers from 0 to 255. PyTorch vision code uses (N, C, H, W): batch, channels, height, width, as float32.
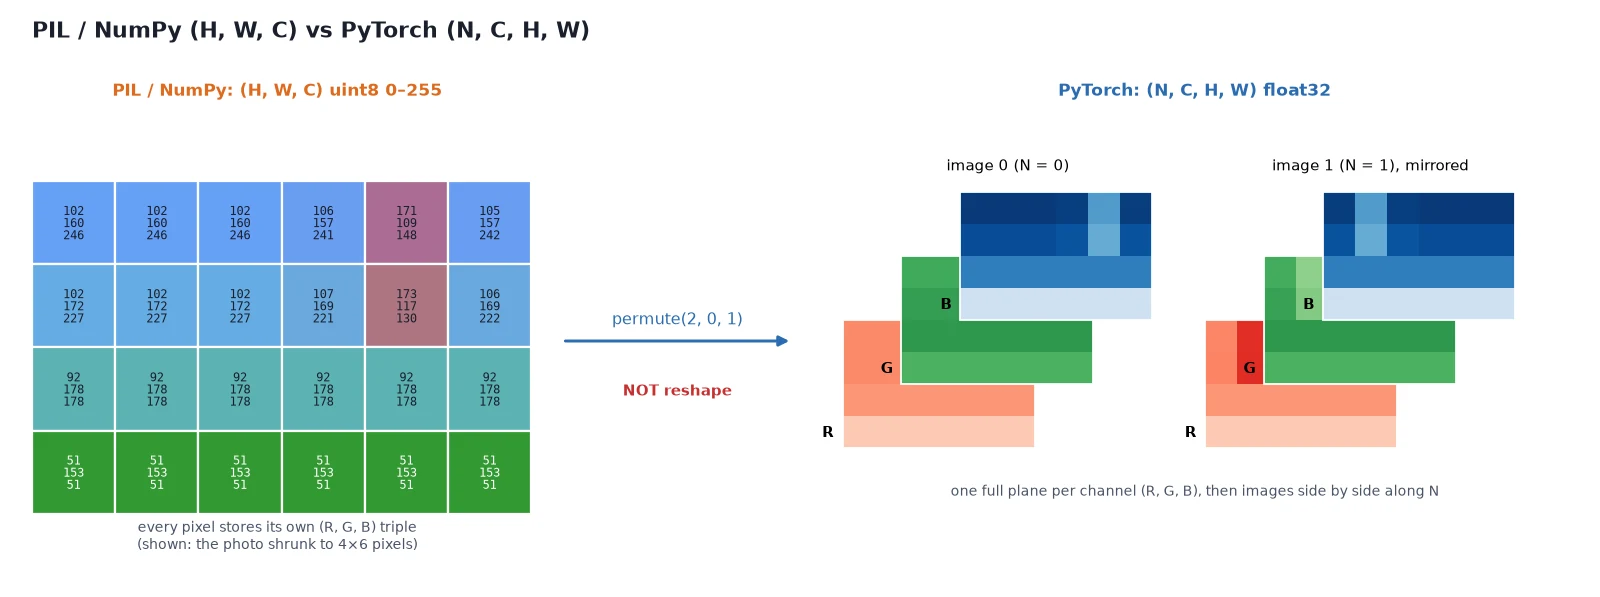
Why channels first? Most image layers in PyTorch, and the patch code in post 7, treat each channel as one full plane. Keeping the planes together makes those operations simple and fast.
Why a batch axis? GPUs are fast when they process many images at once. Even a single image travels as a batch of one.
import numpy as np
import torch
from PIL import Image

pil = Image.open("photo.jpg")
arr = np.asarray(pil)
print("PIL/NumPy layout (H, W, C):", arr.shape, arr.dtype)

t = torch.from_numpy(arr.copy())        # still (H, W, C), uint8
chw = t.permute(2, 0, 1)                # (C, H, W): move channels first
print("PyTorch layout (C, H, W):", tuple(chw.shape))
nchw = chw.unsqueeze(0)                 # add the batch axis
print("Batch layout (N, C, H, W):", tuple(nchw.shape))

wrong = t.reshape(3, 120, 160)          # same numbers, WRONG meaning
print("reshape == permute?", torch.equal(wrong, chw))PIL/NumPy layout (H, W, C): (120, 160, 3) uint8
PyTorch layout (C, H, W): (3, 120, 160)
Batch layout (N, C, H, W): (1, 3, 120, 160)
reshape == permute? FalseWatch out: That last line is important. reshape(3, 120, 160) gives the right shape but scrambles the meaning: it chops the interleaved RGB bytes into three blocks instead of separating the channels. Your model will not crash. It will just quietly learn garbage. Use permute to reorder axes and reshape only to split or merge neighboring axes.
The image tensor (N, C, H, W) in [-1, 1]: what, why, how
What it is: the only format TinyDiT ever sees. The clean training images, the Gaussian noise, the half-noisy mixtures in between, and the velocity the model predicts will all be (N, 3, 32, 32) float tensors in this exact layout. Post 7 cuts this tensor into patches, and post 9 builds a model whose output has this same shape.
Why it works: a model has no idea what “width” or “red” means. It only sees positions in an array. If one part of your code treats axis 2 as height and another treats it as width, or splits channels with reshape instead of permute, nothing crashes; the model simply learns from scrambled pictures and you get mysteriously bad samples weeks later.
Fixing one convention in one file (images.py) and using it everywhere removes that whole class of bugs. The [-1, 1] range matters too: it keeps images on the same scale as the standard-normal noise they get mixed with.
How it works: loading goes: file → PIL image (H, W, C) uint8 → tensor → permute(2, 0, 1) to (C, H, W) → divide by 255 → 2x – 1 → unsqueeze(0) to (1, C, H, W) → .to(device). Saving runs the same steps backwards, with a clamp(0, 1) so slightly out-of-range model outputs still save cleanly.
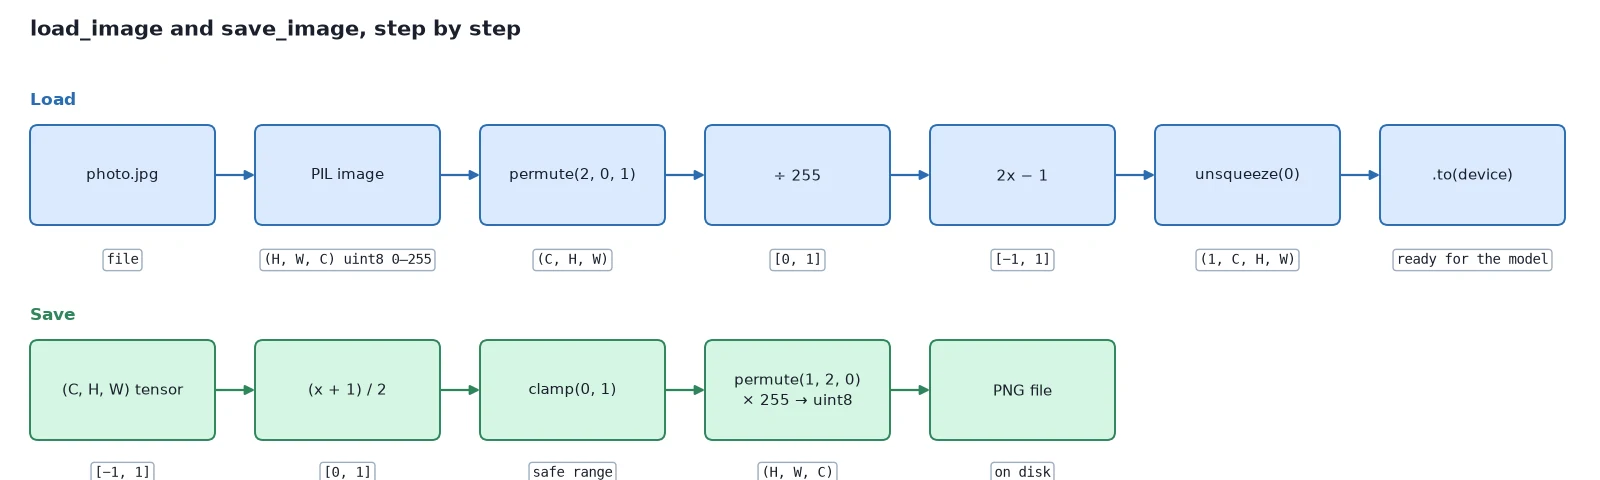
What you just built: The series-wide image convention: float32, (N, C, H, W), values in [-1, 1], converted from HWC with permute.
Step 5/6: The TinyDiT Image Utilities
In this step: We write tinydit/images.py, the first real module of the project, and use it to load, batch and save pictures.
Here is the first real module of the project, tinydit/images.py. It fixes the conventions the whole series uses: model tensors are float32, (N, C, H, W), values in [-1, 1]; files on disk are ordinary 8-bit RGB images.
The first two functions convert between a PIL image and a (C, H, W) tensor in [0, 1], using permute both ways:
"""Image <-> tensor utilities (post 2).

Convention for the whole series:
  * model tensors are float32, layout (N, C, H, W), values in [-1, 1]
  * files on disk are ordinary 8-bit RGB images
"""
from pathlib import Path

import numpy as np
import torch
from PIL import Image


def pil_to_tensor(img: Image.Image) -> torch.Tensor:
    """PIL RGB image -> float tensor (C, H, W) in [0, 1]."""
    arr = np.asarray(img.convert("RGB"), dtype=np.uint8)   # (H, W, C)
    x = torch.from_numpy(arr.copy())                        # uint8 (H, W, C)
    x = x.permute(2, 0, 1)                                  # (C, H, W)
    return x.float() / 255.0


def tensor_to_pil(x: torch.Tensor) -> Image.Image:
    """Float tensor (C, H, W) in [0, 1] -> PIL RGB image."""
    x = x.detach().to("cpu").clamp(0, 1)
    arr = (x.permute(1, 2, 0) * 255).round().to(torch.uint8).numpy()  # (H, W, C)
return Image.fromarray(arr)Two one-liners move values between the pixel range [0, 1] and the model range [-1, 1]:
def to_model_range(x: torch.Tensor) -> torch.Tensor:
    """[0, 1] -> [-1, 1]"""
    return x * 2.0 - 1.0


def from_model_range(x: torch.Tensor) -> torch.Tensor:
    """[-1, 1] -> [0, 1]"""
return (x + 1.0) / 2.0load_image and save_image chain those steps into the full round trip, adding and removing the batch axis:
def load_image(path: str | Path, size: int | None = 32,
               device: str | torch.device = "cpu") -> torch.Tensor:
    """Read an image file -> (1, 3, size, size) float tensor in [-1, 1] on `device`."""
    img = Image.open(path).convert("RGB")
    if size is not None:
        img = img.resize((size, size), Image.BICUBIC)
    x = to_model_range(pil_to_tensor(img))   # (3, H, W)
    return x.unsqueeze(0).to(device)          # (1, 3, H, W)


def save_image(x: torch.Tensor, path: str | Path) -> None:
    """Save a (3, H, W) or (1, 3, H, W) tensor in [-1, 1] as a PNG."""
    if x.dim() == 4:
        x = x[0]
tensor_to_pil(from_model_range(x)).save(path)make_grid pastes a batch into one big picture, and save_grid writes it to disk:
def make_grid(x: torch.Tensor, nrow: int = 8, pad: int = 2) -> torch.Tensor:
    """(N, C, H, W) in [-1, 1] -> one (C, H', W') grid image, also in [-1, 1]."""
    n, c, h, w = x.shape
    ncol = nrow
    nrows = (n + ncol - 1) // ncol
    grid = torch.ones(c, nrows * (h + pad) + pad, ncol * (w + pad) + pad,
                      dtype=x.dtype, device=x.device)       # white background
    for i in range(n):
        r, col = divmod(i, ncol)
        top, left = pad + r * (h + pad), pad + col * (w + pad)
        grid[:, top:top + h, left:left + w] = x[i]
    return grid


def save_grid(x: torch.Tensor, path: str | Path, nrow: int = 8) -> None:
    """Save a batch (N, 3, H, W) in [-1, 1] as one grid PNG."""
save_image(make_grid(x, nrow=nrow), path)If you don’t have a photo handy, this little script draws one (a sky, a lawn and a red sun) and saves it as photo.jpg. It is also a nice broadcasting exercise:
# Don't have a photo handy? This makes "photo.jpg": a sky-to-grass gradient with a red sun.
import torch
from tinydit.images import tensor_to_pil

h, w = 120, 160
ys = torch.linspace(0, 1, h).view(h, 1).expand(h, w)
xs = torch.linspace(0, 1, w).view(1, w).expand(h, w)
sky = torch.stack([0.4 + 0.0 * ys, 0.6 + 0.2 * ys, 1.0 - 0.3 * ys])   # (3, H, W)
grass = torch.stack([0.2 + 0 * ys, 0.6 + 0 * ys, 0.2 + 0 * ys])
img = torch.where(ys > 0.7, grass, sky)
sun = ((xs - 0.75) ** 2 + (ys - 0.25) ** 2 * (h / w) ** 2) < 0.01
img[:, sun] = torch.tensor([1.0, 0.2, 0.1]).view(3, 1)
tensor_to_pil(img).save("photo.jpg")
print("saved photo.jpg", tuple(img.shape))saved photo.jpg (3, 120, 160)Now load it as a model-ready tensor, build a small batch, and save the images back out:
import torch
from tinydit import get_device
from tinydit.images import load_image, save_image, from_model_range

device = get_device()
x = load_image("photo.jpg", size=32, device=device)   # any JPG/PNG works
print(x.shape, x.dtype, x.device)
print("range:", round(x.min().item(), 3), "to", round(x.max().item(), 3))

# A batch is just several images stacked on a new first axis.
batch = torch.cat([x, x.flip(-1), -x], dim=0)  # original, mirrored, color-inverted
print(batch.shape)

for i, name in enumerate(["orig", "mirror", "invert"]):
    save_image(batch[i], f"out_{name}.png")
print("pixel (row 0, col 0) of the original, RGB in [0,1]:",
[round(v, 3) for v in from_model_range(x[0, :, 0, 0]).tolist()])torch.Size([1, 3, 32, 32]) torch.float32 cpu
range: -0.875 to 1.0
torch.Size([3, 3, 32, 32])
pixel (row 0, col 0) of the original, RGB in [0,1]: [0.4, 0.6, 0.996]torch.cat(..., dim=0) glues tensors along an existing axis (here the batch axis). Its cousin torch.stack creates a new axis, and we use it later to batch single images.
flip(-1) mirrors the width axis, and negating the tensor inverts the colors, because -1 and 1 swap places. In post 9, save_grid from the same file will save TinyDiT’s very first generated pictures.
What you just built: tinydit/images.py with load_image, save_image, make_grid and save_grid, tested on a real photo.
Step 6/6: The Three Classic Tensor Errors (and Fixes)
In this step: We trigger the three errors you will meet most often in PyTorch on purpose, so they’re familiar when they show up for real.
import torch
from torch import nn

layer = nn.Linear(48, 8)          # expects vectors of length 48 (float32)

# 1) Shape error
try:
    layer(torch.rand(4, 32))
except RuntimeError as e:
    print("Shape error:", e)

# 2) dtype error: raw image bytes are uint8, layers want float32
pixels = torch.randint(0, 256, (4, 48), dtype=torch.uint8)
try:
    layer(pixels)
except RuntimeError as e:
    print("dtype error:", e)
print("fixed:", layer(pixels.float() / 255).shape)

# 3) Device error: on a GPU machine, mixing a cuda tensor with a cpu tensor fails.
#    We fake the check here so it also runs on CPU-only machines.
a, b = torch.rand(2), torch.rand(2)
print("same device?", a.device == b.device, "->", (a + b).shape)Shape error: addmm: mat1 and mat2 shapes cannot be multiplied (4x32 and 48x8)
dtype error: mat1 and mat2 must have the same dtype, but got Byte and Float
fixed: torch.Size([4, 8])
same device? True -> torch.Size([2])| Error | What the message says | Usual cause | Fix |
|---|---|---|---|
| Shape | mat1 and mat2 shapes cannot be multiplied (4x32 and 48x8) | The layer expected 48 features, got 32 | Print x.shape right before the failing line; fix the reshape or the layer size |
| dtype | mat1 and mat2 must have the same dtype, but got Byte and Float | Raw uint8 pixels went straight into a layer | x.float() / 255, or use load_image, which already does it |
| Device | Expected all tensors to be on the same device, but found at least two devices, cuda:0 and cpu! | Data on CPU, model on GPU (or the other way) | Move both: model.to(device) and x.to(device) |
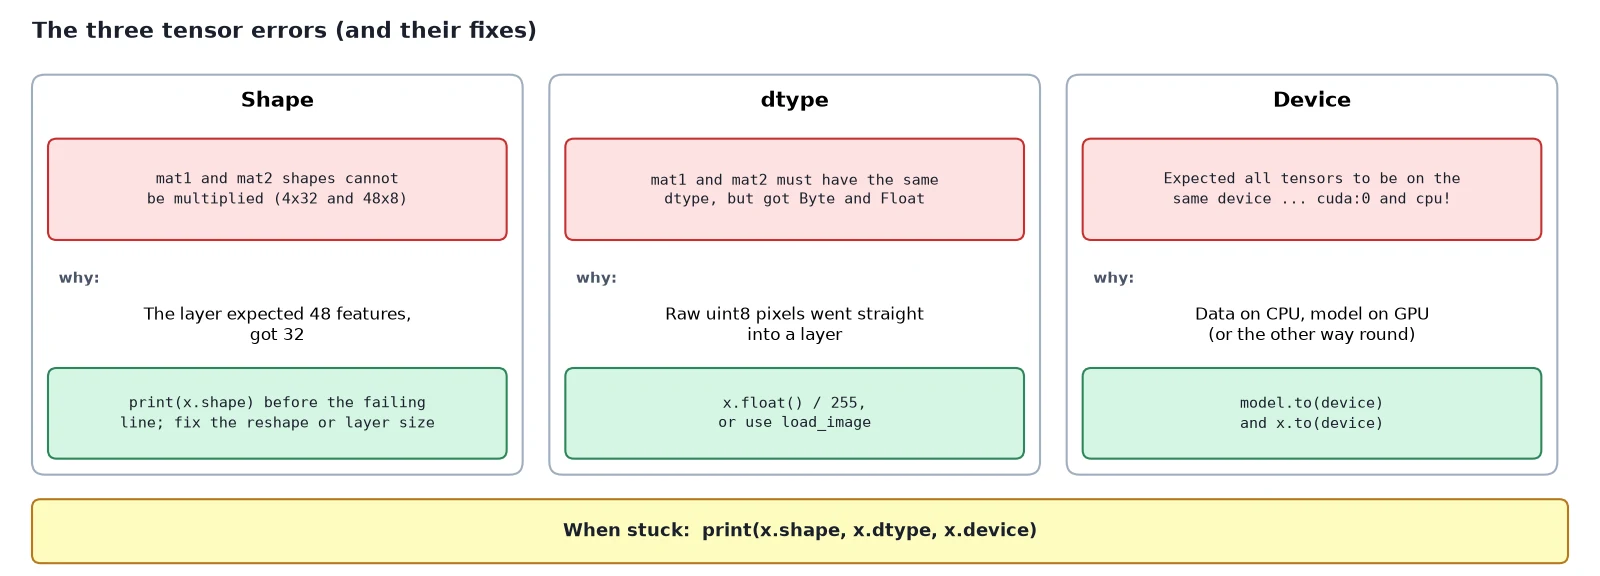
Note: When anything goes wrong, the fastest debugging line in PyTorch is print(x.shape, x.dtype, x.device).
What you just built: A cheat sheet for the shape, dtype and device errors, and the one print line that diagnoses all three.
Recap
- A PyTorch tensor is numbers plus a shape, a dtype and a device. Print all three when debugging.
viewshares memory and needs a contiguous tensor.reshapecopies only when needed.clonealways copies.- Broadcasting lines shapes up from the right and stretches size-1 axes. Use
(3, 1, 1)for per-channel values. - Vision code uses
(N, C, H, W). Convert from HWC withpermute, neverreshape. tinydit/images.pyloads, saves and grids images in the series-wide format: float32, NCHW, values in [-1, 1].
Next up: In PyTorch Autograd: How backward() Builds Gradients we look at what makes PyTorch more than a NumPy clone: autograd, the machinery that computes gradients for us. We’ll use it to fit a line with nothing but tensors.
Series: PyTorch Tutorial 2026 (14 posts)
- Post 1: PyTorch Tutorial 2026: From Tensors to Tiny Diffusion
- Post 2: PyTorch Tensors Explained: Shapes, Broadcasting, and Images as Arrays (you are here)
- Post 3: PyTorch Autograd: How backward() Builds Gradients
- Post 4: PyTorch DataLoader Explained: Datasets, Batches, and Image Folders
- Post 5: PyTorch nn.Module and the Training Loop: Layers, Loss, and Checkpoints
- Post 6: Attention and the Transformer Block in PyTorch
- Post 7: Patch Embeddings in PyTorch: How a Transformer Reads an Image
- Post 8: Flow Matching in PyTorch: Train a Model to Follow a Straight Line
- Post 9: Build a Tiny Diffusion Transformer in PyTorch (DiT from Scratch)
- Post 10: torch.compile, Mixed Precision, and SDPA: Speed Up TinyDiT
- Post 11: RMSNorm, QK-Norm, SwiGLU, and 2D RoPE in a Tiny DiT
- Post 12: adaLN-Zero and Classifier-Free Guidance in PyTorch
- Post 13: MMDiT Joint Attention in PyTorch: Two Streams, One Generator
- Post 14: Train and Sample Like 2026: Logit-Normal Steps, EMA, and Few-Step Flow
← Previous: Post 1: PyTorch Tutorial 2026: From Tensors to Tiny Diffusion
Next → Post 3: PyTorch Autograd: How backward() Builds Gradients