PyTorch Tutorial 2026: From Tensors to Tiny Diffusion
Where you are: Post 1 of 14 in PyTorch Tutorial 2026 · about 11 min read
What you’ll build: Your PyTorch setup (Colab or local), a device check that picks your GPU, your first tensors, and a map of the 14-post TinyDiT project.
You’ll need: Nothing yet. This is the first post. Basic Python is enough.
In this post:
- Introduction
- Step 1/6: What You Will Build in This PyTorch Tutorial
- Step 2/6: What Is PyTorch in 2026?
- Step 3/6: Colab or Local? Install PyTorch
- Step 4/6: Check Your Install and Your GPU
- Step 5/6: Your First Tensor
- Step 6/6: How to Follow the Series
- Recap
Series: PyTorch Tutorial 2026 (14 posts)
- Post 1: PyTorch Tutorial 2026: From Tensors to Tiny Diffusion (you are here)
- Post 2: PyTorch Tensors Explained: Shapes, Broadcasting, and Images as Arrays
- Post 3: PyTorch Autograd: How backward() Builds Gradients
- Post 4: PyTorch DataLoader Explained: Datasets, Batches, and Image Folders
- Post 5: PyTorch nn.Module and the Training Loop: Layers, Loss, and Checkpoints
- Post 6: Attention and the Transformer Block in PyTorch
- Post 7: Patch Embeddings in PyTorch: How a Transformer Reads an Image
- Post 8: Flow Matching in PyTorch: Train a Model to Follow a Straight Line
- Post 9: Build a Tiny Diffusion Transformer in PyTorch (DiT from Scratch)
- Post 10: torch.compile, Mixed Precision, and SDPA: Speed Up TinyDiT
- Post 11: RMSNorm, QK-Norm, SwiGLU, and 2D RoPE in a Tiny DiT
- Post 12: adaLN-Zero and Classifier-Free Guidance in PyTorch
- Post 13: MMDiT Joint Attention in PyTorch: Two Streams, One Generator
- Post 14: Train and Sample Like 2026: Logit-Normal Steps, EMA, and Few-Step Flow
Introduction
Welcome to PyTorch Tutorial 2026: From Tensors to Tiny Diffusion. This pytorch tutorial series takes you from your very first tensor all the way to a small image generator that you write yourself, line by line.
No copy-pasting a giant repo you don’t understand. We build one project, called TinyDiT, and every post adds one real piece of it.
TinyDiT is a tiny version of the kind of model behind Stable Diffusion 3 and FLUX: a Diffusion Transformer (DiT) trained with flow matching. It is small enough to train on a free Google Colab GPU, and the first version even runs (slowly) on a laptop CPU.
Once the simple version works, the Expert part of the series upgrades it with the layers that current state-of-the-art models use, one at a time, and measures what each one actually does.
In this first post we install PyTorch, check which device you have, and make your first tensor. This page is also the hub of the series, so the full table of contents is in the last step.
Step 1/6: What You Will Build in This PyTorch Tutorial
In this step: We describe the finished TinyDiT project in one sentence and map each idea in it to the post that teaches it.
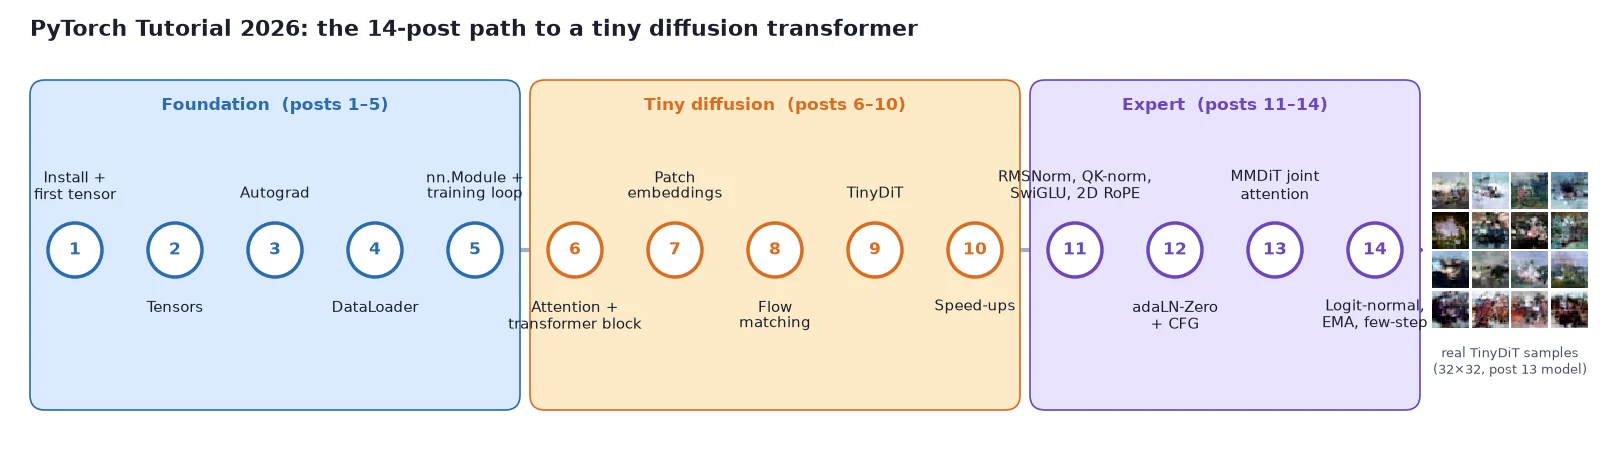
Here is the finished project in one sentence: a transformer that looks at a noisy picture, cut into small patches, and predicts which direction to move each pixel to make it look more like a real image. Repeat that small step 20 times starting from pure noise, and a picture appears.
That one sentence hides every important idea in modern image generation:
- Tensors hold the images, the noise, and the model’s weights (posts 1–2).
- Autograd computes how to change millions of weights to reduce the error (post 3).
- Datasets and DataLoaders feed the model batches of images (post 4).
- nn.Module and a training loop turn layers into a model and a model into something that learns (post 5).
- Attention and the transformer block let every part of the picture look at every other part (post 6).
- Patch embeddings turn a picture into a sequence of tokens a transformer can read (post 7).
- Flow matching gives the model a simple target: the straight-line direction from image to noise (post 8).
- TinyDiT wires everything together and generates its first images (post 9), then gets faster with
torch.compile, mixed precision and fused attention (post 10). - Expert upgrades: RMSNorm, QK-norm, SwiGLU, 2D RoPE, adaLN-Zero, classifier-free guidance, MMDiT joint attention, logit-normal timesteps, EMA, and few-step sampling (posts 11–14).
We train on CIFAR-10, a classic dataset of 60,000 tiny 32×32 color pictures in 10 classes (planes, cars, birds, cats…). Small pictures keep training cheap, and you will be able to point the same code at your own image folder later.
Note: Why no U-Net and no GAN? For years, image generators used a U-Net trained to predict noise, and before that, GANs. Since DiT (Peebles and Xie, 2023) and flow matching (Lipman et al., 2023; Liu et al., 2023), the big open models, including Stable Diffusion 3 and FLUX, use a transformer trained to follow a straight line from noise to image. That recipe is also easier to learn, so it’s what we use from the start.
What you just built: A clear picture of the goal: TinyDiT, a small diffusion transformer trained with flow matching on CIFAR-10, and which post adds each piece.
Step 2/6: What Is PyTorch in 2026?
In this step: We see what PyTorch actually does, the four moves of training a network, and which PyTorch version this series uses.
PyTorch is a Python library for doing math on big arrays of numbers, on a CPU or a GPU, and for automatically computing gradients of that math. Those two features are all you need to train a neural network:
- Store data and model weights as arrays (PyTorch calls them tensors).
- Compute a prediction and measure how wrong it is (the loss).
- Ask PyTorch for the gradient of the loss with respect to every weight.
- Nudge every weight a little in the direction that reduces the loss. Repeat.
On top of that core, PyTorch gives you ready-made layers (torch.nn), optimizers (torch.optim) and data loading (torch.utils.data). The 2.x releases add speed tools like torch.compile, mixed precision (torch.amp) and fused attention (F.scaled_dot_product_attention). We will use all of these, each when it is needed.
This series targets PyTorch 2.15, the current stable release (announced on the official PyTorch blog on 28 October 2026). Every code block in these posts was run with PyTorch 2.15.0 on Python 3.13, so the outputs you see are real.
Note: Anything from PyTorch 2.4 onward should run almost all of the code in this series.
What you just built: The mental model for the whole series: PyTorch is tensors plus automatic gradients, with layers, optimizers, data tools and compilers on top.
Step 3/6: Colab or Local? Install PyTorch
In this step: We pick where your code will run, a free Colab GPU or your own machine, and install PyTorch there.
You have two easy options. You do not need to buy a GPU for this series.
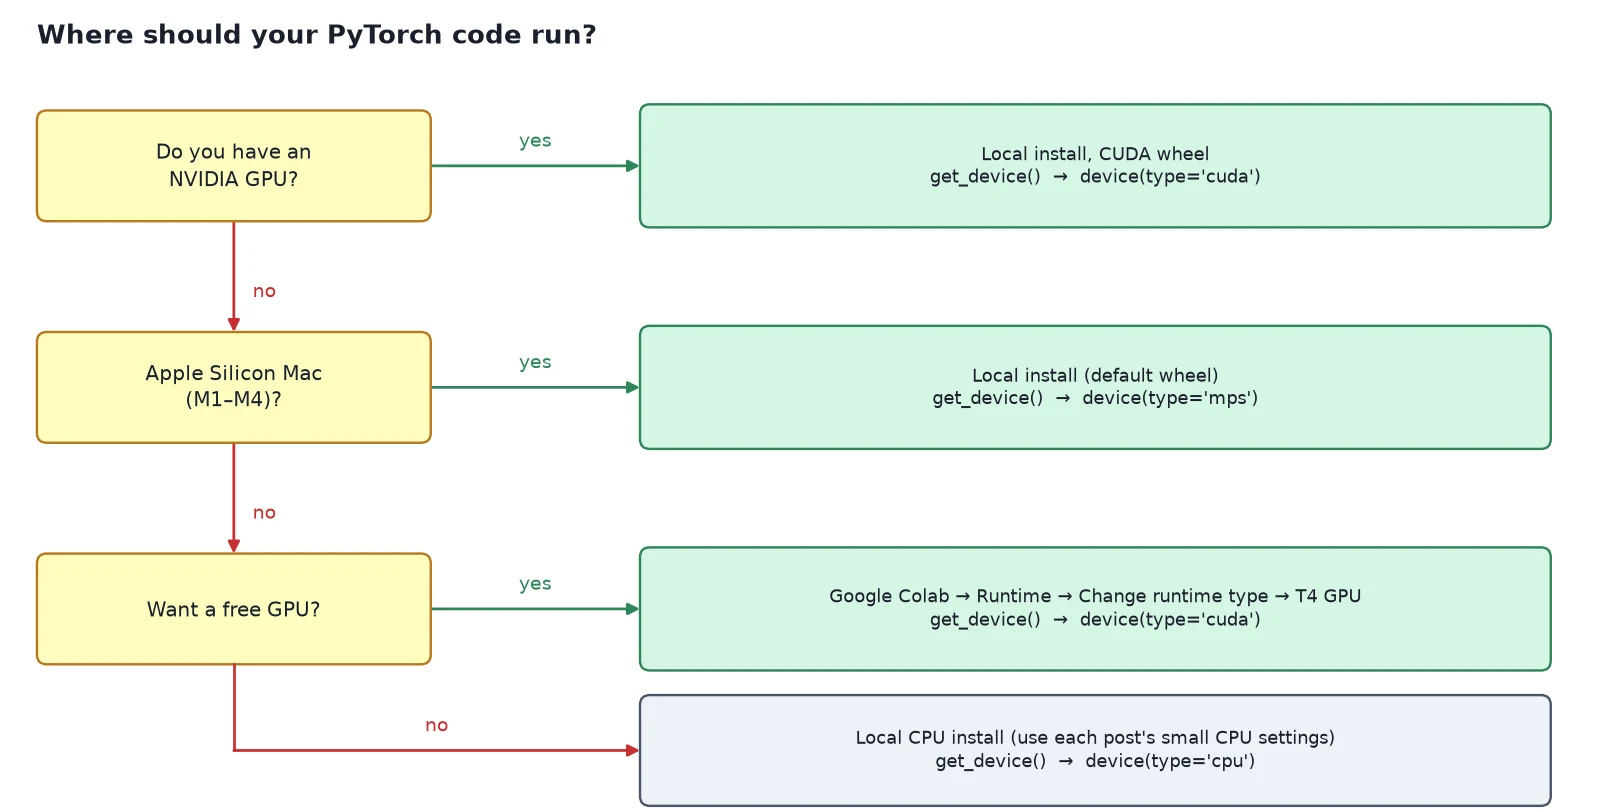
Option 1: Google Colab (recommended for beginners)
Go to colab.research.google.com, create a new notebook, then choose Runtime → Change runtime type → T4 GPU. PyTorch is already installed.
In the first cell, print the version and check that the GPU is visible:
import torch
print(torch.__version__)
print(torch.cuda.is_available())If the version printed is older than 2.15, run !pip install -U torch torchvision in a cell and restart the runtime.
Option 2: Install PyTorch locally
You need Python 3.11 or newer (PyTorch 2.15 supports 3.11 to 3.15). Make a fresh virtual environment so PyTorch does not fight with other projects:
# 1) Create and activate a virtual environment
python3 -m venv .venv
source .venv/bin/activate          # Windows: .venv\Scripts\activate

# 2a) Linux with an NVIDIA GPU, or macOS (Apple Silicon uses "mps" automatically):
pip install torch torchvision

# 2b) CPU-only machine (smaller download):
pip install torch torchvision --index-url https://download.pytorch.org/whl/cpu

# 3) Check it worked
python -c "import torch; print(torch.__version__)"Watch out: The official install selector at pytorch.org/get-started/locally is the source of truth. It builds the exact command for your operating system, package manager and CUDA version. If the wheels change after this post goes live, trust the selector over me.
What you just built: A working PyTorch install, either in a Colab notebook with a T4 GPU or in a local virtual environment.
Step 4/6: Check Your Install and Your GPU
In this step: We write the first file of the TinyDiT repo, which prints your PyTorch version and picks the best device.
This is the very first file of the TinyDiT repo, hello_torch.py. It starts with a function that picks the best device:
"""hello_torch.py - commit one of the TinyDiT repo.

Prints the PyTorch version, the best available device, and a 3x3 tensor.
Run:  python hello_torch.py
"""
import torch


def pick_device() -> torch.device:
    """Prefer an NVIDIA/AMD GPU (cuda), then Apple Silicon (mps), then CPU."""
    if torch.cuda.is_available():
        return torch.device("cuda")
    if torch.backends.mps.is_available():
        return torch.device("mps")
return torch.device("cpu")The main block prints the version and the device, then makes a small random tensor on it:
if __name__ == "__main__":
    device = pick_device()
    print("PyTorch version:", torch.__version__)
    print("Device:", device)
    if device.type == "cuda":
        print("GPU:", torch.cuda.get_device_name(0))

    x = torch.rand(3, 3, device=device)
    print(x)
print("shape:", tuple(x.shape), "| dtype:", x.dtype, "| device:", x.device)Run it with python hello_torch.py. On my test machine (CPU only) the output is:
PyTorch version: 2.15.0+cpu
Device: cpu
tensor([[0.8110, 0.5316, 0.1587],
        [0.4307, 0.2078, 0.4103],
        [0.9693, 0.8319, 0.7084]])
shape: (3, 3) | dtype: torch.float32 | device: cpu
On a Colab T4 you will see Device: cuda and GPU: Tesla T4. On an Apple Silicon Mac you will see Device: mps. All three are fine.
The device logic picks cuda first (NVIDIA GPUs, and AMD GPUs through ROCm builds, both show up as cuda), then mps (Apple’s Metal backend), then falls back to cpu. The repo keeps the same logic in tinydit/device.py, so every later script can just call get_device():
"""Device helper used by every script in the series (post 1)."""
import torch


def get_device(prefer: str | None = None) -> torch.device:
    """Return the best device: cuda > mps > cpu.

    Pass prefer="cpu" (or "cuda", "mps") to force one.
    """
    if prefer is not None:
        return torch.device(prefer)
    if torch.cuda.is_available():
        return torch.device("cuda")
    if torch.backends.mps.is_available():
        return torch.device("mps")
return torch.device("cpu")Note: No GPU? Everything in posts 1–8 runs comfortably on a CPU. From post 9 onward, each post gives a “CPU settings” line (fewer images, a smaller model, fewer steps) so you can still see the whole pipeline work, just with blurrier results.
What you just built: hello_torch.py and tinydit/device.py, whose get_device() returns cuda, then mps, then cpu.
Step 5/6: Your First Tensor
In this step: We meet the tensor, the one object everything in PyTorch is made of, and do our first math and device moves with it.
Whenever this series introduces a new layer, block or training piece, it gets three labeled answers: What it is, Why it works, and How it works. This post adds no neural-network layer yet, so we start with the tensor.
What it is
A tensor is the array PyTorch computes on. A single number, a list of numbers, a table, a stack of color images, the weights of a layer, and the gradients of those weights are all tensors.
In TinyDiT, the input picture, the noise, the predicted velocity and every weight will be tensors.
Why it works
A plain Python list can store numbers, but it cannot run on a GPU, it does not know its own number type, and it cannot track gradients. A tensor carries three extra facts with the numbers:
- shape: how many numbers along each axis, for example
(2, 3)for 2 rows and 3 columns; - dtype: the number type, usually
float32for model math andint64for labels; - device: where the numbers live (
cpu,cuda, ormps).
Because data, weights and gradients all share this one format, PyTorch can push the whole computation to a GPU and differentiate through it automatically.
How it works
You make a tensor from a Python list with torch.tensor, or ask for one filled with zeros, ones or random numbers:
import torch

torch.manual_seed(0)                 # same "random" numbers every run

a = torch.tensor([[1.0, 2.0, 3.0],
                  [4.0, 5.0, 6.0]])  # from a Python list
b = torch.rand(2, 3)                 # uniform random numbers in [0, 1)
c = torch.zeros(2, 3)
d = torch.ones(2, 3, dtype=torch.int64)

print(a)
print("shape:", a.shape, "| dtype:", a.dtype, "| device:", a.device)
print(b)
print(c)
print(d, d.dtype)tensor([[1., 2., 3.],
[4., 5., 6.]])
shape: torch.Size([2, 3]) | dtype: torch.float32 | device: cpu
tensor([[0.4963, 0.7682, 0.0885],
[0.1320, 0.3074, 0.6341]])
tensor([[0., 0., 0.],
[0., 0., 0.]])
tensor([[1, 1, 1],
[1, 1, 1]]) torch.int64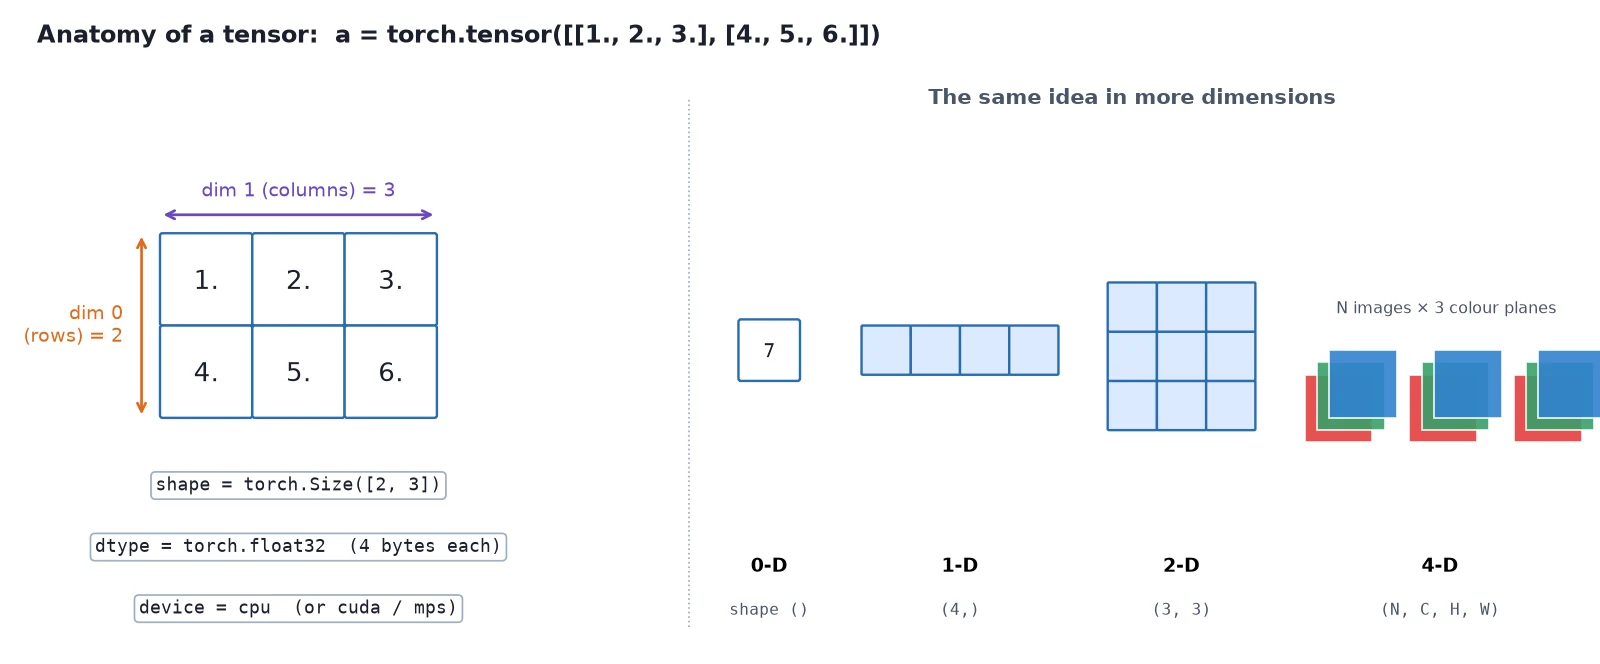
Tensors support the math you would expect. Operators like + and * work element by element, and @ is matrix multiplication:
import torch

a = torch.tensor([[1.0, 2.0, 3.0],
                  [4.0, 5.0, 6.0]])

print(a + 10)          # add to every element
print(a * a)           # element-wise multiply
print(a.sum(), a.mean())
print(a @ a.T)         # matrix multiply: (2, 3) @ (3, 2) -> (2, 2)
print(a[1, 2])         # row 1, column 2 -> 6.0
print(a[1, 2].item()) # a plain Python floattensor([[11., 12., 13.],
[14., 15., 16.]])
tensor([[ 1., 4., 9.],
[16., 25., 36.]])
tensor(21.) tensor(3.5000)
tensor([[14., 32.],
[32., 77.]])
tensor(6.)
6.0Matrix multiplication is the workhorse of deep learning. The shapes must line up: for A @ B, the last axis of A must match the first axis of B.
(2 \times \underbrace{3}_{\text{must match}}) \;@\; (\underbrace{3}_{\text{must match}} \times 2) \;\rightarrow\; (2 \times 2)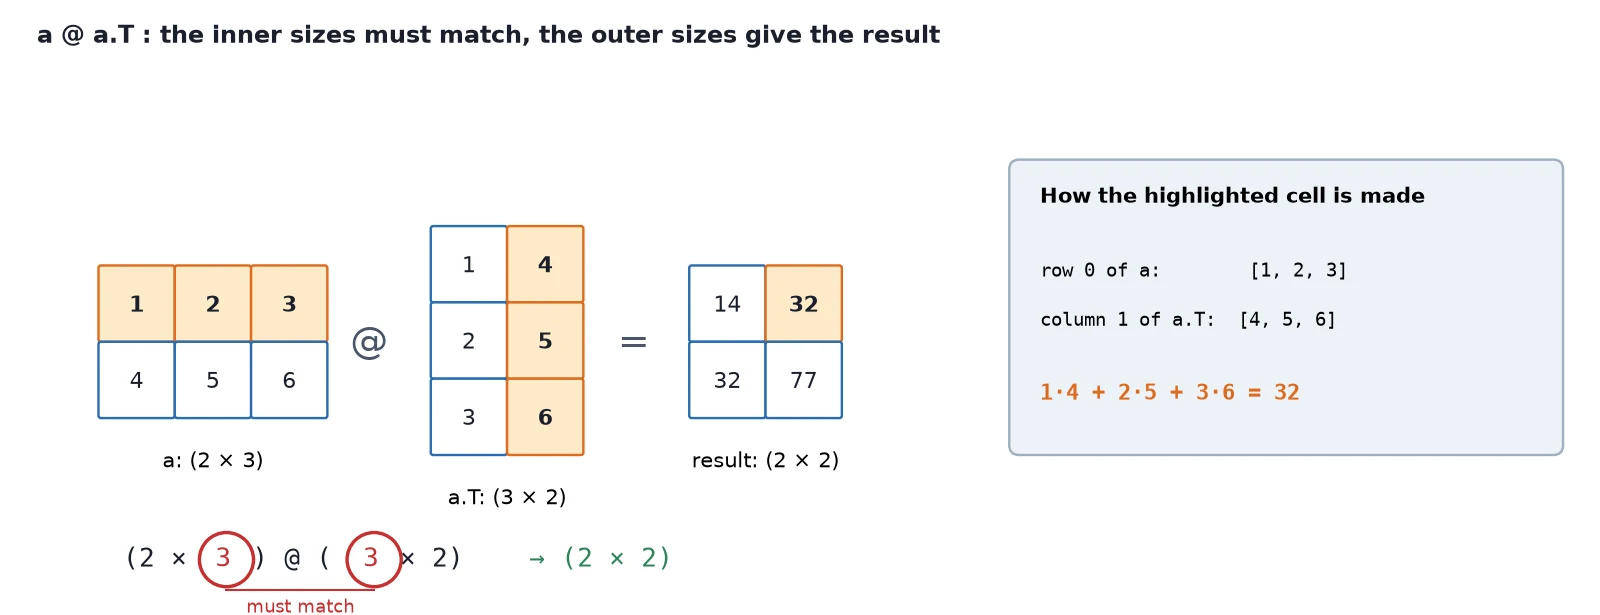
Finally, moving a tensor to the GPU is one call:
import torch
from tinydit import get_device

device = get_device()               # cuda > mps > cpu
x = torch.rand(3, 3).to(device)     # move a tensor to the device
y = torch.rand(3, 3, device=device) # or create it there directly
z = x @ y                           # both on the same device, so this works
print(z.device)
print(z.cpu().shape) # .cpu() brings it back, e.g. to save or plotcpu
torch.Size([3, 3])Watch out: Tensors that meet in one operation must be on the same device. Mixing a cpu tensor and a cuda tensor in one operation raises an error.
What you just built: Your first tensors: created from lists and random numbers, combined with element-wise math and @, and moved to your device.
Step 6/6: How to Follow the Series
In this step: We cover how the series is meant to be read, what the repo looks like, and the full table of contents.
- One repo, one project. Every post adds files to the same
tinyditrepo. Nothing is a throwaway example; later posts import what earlier posts built. - Read in order the first time. Each post assumes the previous ones. After that, the table below makes a good reference.
- Run the code. Each snippet is short and was tested exactly as shown. Typing it out (instead of pasting) is the fastest way to learn the APIs.
- Every new layer gets a What it is / Why it works / How it works. If something feels like magic, that part is where to look.
By the end of post 7, the repo looks like this. Posts 8–14 add the flow-matching loss, the TinyDiT model, and the expert upgrades.
tinydit-repo/
├── hello_torch.py        # post 1: version + device check
├── examples/             # posts 3, 5, 7: fit_line.py, patch_denoiser.py, image_denoiser.py
└── tinydit/
    ├── __init__.py
    ├── device.py         # post 1: get_device()
    ├── config.py         # post 7: TinyDiTConfig (sizes used all series)
    ├── images.py         # post 2: image <-> tensor utilities
    ├── data.py           # post 4: CIFAR-10 + image-folder loaders
    ├── layers.py         # post 5: FeedForward, ResidualFFN
    ├── trainer.py        # post 5: Trainer with checkpoints
    ├── attention.py      # post 6: MultiHeadAttention
    ├── blocks.py         # post 6: TransformerBlock
    └── patches.py        # post 7: patchify, PatchEmbed, PosEmbed2D, PatchHead
The complete series: table of contents
What you just built: A plan for reading the series, the repo layout after post 7, and the full list of posts.
Recap
- PyTorch is tensors plus automatic gradients, with layers, optimizers, data tools and compilers on top.
- Use Colab (free T4 GPU) or a local install with Python 3.11+. The official selector gives the exact install command.
get_device()pickscuda, thenmps, thencpu. Tensors that meet in one operation must share a device.- A tensor is numbers plus a shape, a dtype and a device.
- Over 14 posts we build TinyDiT, a small diffusion transformer trained with flow matching, then upgrade it with the layers current models use.
Next up: In PyTorch Tensors Explained: Shapes, Broadcasting, and Images as Arrays: shapes, broadcasting, and how a photo becomes an (N, C, H, W) tensor. That file, tinydit/images.py, is the first module the whole project imports.
Series: PyTorch Tutorial 2026 (14 posts)
- Post 1: PyTorch Tutorial 2026: From Tensors to Tiny Diffusion (you are here)
- Post 2: PyTorch Tensors Explained: Shapes, Broadcasting, and Images as Arrays
- Post 3: PyTorch Autograd: How backward() Builds Gradients
- Post 4: PyTorch DataLoader Explained: Datasets, Batches, and Image Folders
- Post 5: PyTorch nn.Module and the Training Loop: Layers, Loss, and Checkpoints
- Post 6: Attention and the Transformer Block in PyTorch
- Post 7: Patch Embeddings in PyTorch: How a Transformer Reads an Image
- Post 8: Flow Matching in PyTorch: Train a Model to Follow a Straight Line
- Post 9: Build a Tiny Diffusion Transformer in PyTorch (DiT from Scratch)
- Post 10: torch.compile, Mixed Precision, and SDPA: Speed Up TinyDiT
- Post 11: RMSNorm, QK-Norm, SwiGLU, and 2D RoPE in a Tiny DiT
- Post 12: adaLN-Zero and Classifier-Free Guidance in PyTorch
- Post 13: MMDiT Joint Attention in PyTorch: Two Streams, One Generator
- Post 14: Train and Sample Like 2026: Logit-Normal Steps, EMA, and Few-Step Flow
Next → Post 2: PyTorch Tensors Explained: Shapes, Broadcasting, and Images as Arrays